Gladioli: the subtleties of preparing for winter
Gladioli are extremely susceptible to freezing temperatures. They are not able to endure the winter, remaining in the ground. If you want to get an abundantly flowering plant, you need to dig them up in the fall to prevent freezing.

Gladioli: the subtleties of preparing for winter
Optimal timing
The question of when to dig out gladioli worries many novice florists. At this point, several factors should be taken into account: the growing area and the variety.
Depending on the variety
Relying on a variety of thermophilic perennial should be due to the different times of its flowering - each species releases the last bud at a certain period, therefore, it is problematic to determine the exact dates for digging a culture.
It is important to withstand about 30 days from the moment when the gladiolus faded. This is enough for the plant to gain strength before wintering.
It is better to dig up the bulbs in an immature state, which will save the maximum number of babies, which are sifted from the mother bush as they grow older.
When carrying out agrotechnical work, it is required to adhere to some nuances:
- First of all, the early and middle varieties are harvested, then the late ones and those specimens that were grown in the current season from children.
- Varieties with a dark color of buds - red, black, burgundy, purple - have the weakest immunity to diseases and pests, so they are removed first.
- At the end, young corms are dug out due to their long ripening. The same goes for the Japanese gladiolus Montbrecia.
Depending on the region
Timing differs due to varying climatic conditions.
In the Central lane and the Moscow region, gladioli are dug up in September due to the flowering at the end of July.
In the Urals and Siberia, it is possible to grow exceptionally early varieties, which ripen only by the last days of September. Work is carried out until the first subzero temperatures are established.
In the south, the time for carrying out agrotechnical measures falls on August-October.
How to dig
Digging up the flower bulbs is best done on a warm, sunny day. This will ensure faster drying of the seed in the future and reduce the risk of rot. You will need a shovel or garden pitchfork.
Stages:
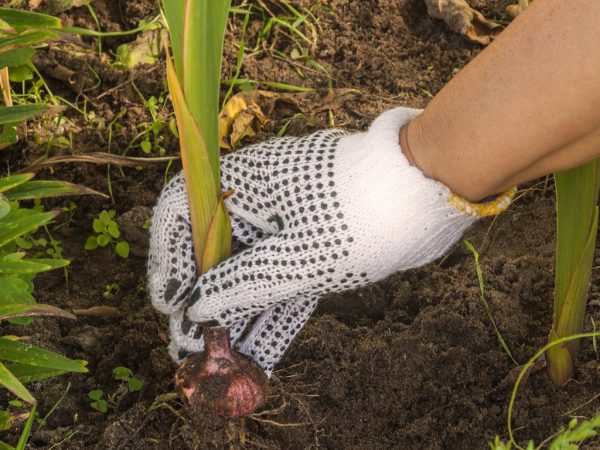
- The shovel is stuck vertically into the ground, while stepping back about 20 cm from the base of the flower. After that, they swing the tool in opposite directions, carefully take out the root system along with a lump of earth and place it on any covering material.
- When the substrate is dry enough, it is shaken off. The bulbs are sorted out by sorting out the children. Dispose of old, damaged and rotten segments. Additionally, the leaf plates should be cut, leaving 5-8 cm from the entire length.
- Are subjected to treatment with Fitosporin according to the instructions.It is also allowed to prepare a soda-salt solution (5 tablespoons of soda and 1 tablespoon of salt per 10 liters of liquid). Such manipulations are carried out in order to prevent diseases.
- Sorted by size and variety. It is not recommended to peel the outer layer of the bulbs.
- Dry thoroughly. They are sent for storage to a basement or cellar, where there is no high humidity.
When sorting tubers, you should pay attention to the quality characteristics of the seed, which can be determined by several criteria.
- Age. The youngest segments (kids) are considered the most productive.
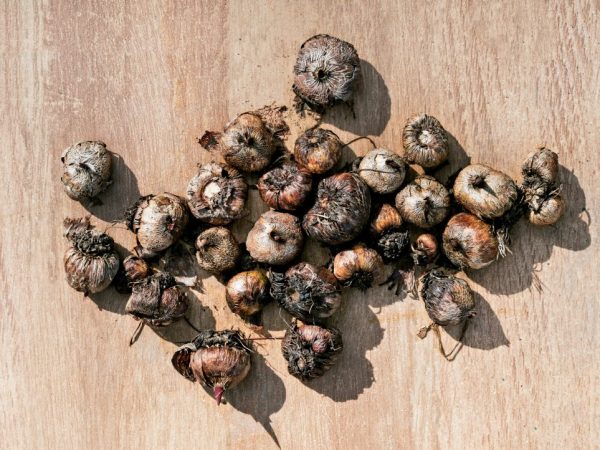
- Dimensions. Ideally, the diameter of the bulb does not exceed 4 cm, in the bottom - 1.
- External characteristics. In quality specimens, the scales have a golden or reddish tint, there are no dark stripes or blotches on the surface. Also, the root tubercles should be examined, which should be sufficiently formed by the time of autumn work.
Storage rules for gladioli
Training

After digging, the tubers should dry out.
Tubers are sensitive to changes in humidity and air temperature - normal conditions must be maintained throughout the entire dormant period of the perennial crop.
To properly prepare gladioli for winter, the following steps must be followed.
- The bulbs are thoroughly washed and treated with a weak solution of potassium permanganate. Then the tubers are sorted by varieties, placed in homemade gauze bags and dipped in a special preparation, which can be used as Intavir, Maxim, HOM.
- It is dried for 4 days, spread out on a horizontal surface, and distributed in wooden boxes with perforations. In them, the seed will reach the desired state for about 1.5 months. To ensure uniform drying, it is recommended to turn the corms systematically, if possible, daily. The maximum allowed storage temperature at this stage is 22 ° C.
- If the bulb has a minor defect, it is not necessary to throw it away. In this case, the damaged part is cut off, and then treated with brilliant green. At the same time, they are isolated from the rest. If wet specimens are present in the total mass, this can lead to deterioration of the entire material due to the spread of fungal or bacterial disease.
- During further storage, the air humidity should be monitored, which should not exceed 75%, and the temperature regime should be around 8 ° C.
- Tuber germination is often observed in the second half of winter. During this period, it is necessary to provide a sufficient degree of lighting, without fear of waking up the flower ahead of time. Instances with green shoots can lie quite calmly until planting in the spring.
Seat selection
Even if it is not possible to keep the plant in the cellar, you can achieve a comfortable lying down at home, for example, on the balcony in the apartment. The main thing is to systematically inspect and sort the spoiled copies.
In the cellar
A cellar or basement is the most suitable room in which you can keep a flower from autumn due to low temperatures and the absence of fluctuations in humidity.
In this case, the tubers are put in wooden boxes, installed according to the principle of a pyramid. It is desirable that aeration holes be made in the container. As a result, it is possible not only to save space, but also to provide the necessary air circulation.
In the absence of suitable containers, it is allowed to use ordinary nylon stockings by the type of onion storage.
It is not recommended to place gladioli in close proximity to fruits and vegetables, because the latter emit a fairly large amount of moisture. As a result, the risk of mold damage to tubers increases. They solve the problem by sorting out the seed, thorough drying.
The exceptions are green apple and mint (they are able to stop the awakening of the plant if necessary).
In the apartment
Suitable for storing gladioli in winter:
- Hallway. At the same time, each tuber is wrapped in paper and wrapped on top with a bag with a large number of holes, so that condensation does not accumulate inside.
- Balcony with double-glazed windows. Corms are folded in one row in perforated boxes, which are installed on a raised platform. If the temperature drops excessively in winter, the container should be removed inside the room and placed near the balcony door. It is also allowed to cover in several layers with a cotton blanket and leave in the same place.
- A pot with drainage holes or containers. In this case, wood ash or coarse sand is poured onto the bottom. The container is placed on the windowsill.
In the fridge

Tubers are afraid of moisture
You can store gladiolus tubers in the refrigerator. For this, the seed is separately wrapped in several layers of newspaper and left in the vegetable storage compartment.
In this case, it is important to monitor the humidity. At regular high rates, the packaging is changed every 7 days.
If moisture has formed on the bulbs, they are sorted out, if necessary, the rotten parts are trimmed and processed, dried thoroughly.
In the trenches
A method thanks to which it is possible to preserve gladioli until spring in their natural environment. It is allowed for mild winters. It involves digging trenches to a depth of 80 cm away from groundwater.
The corms are subjected to standard pruning and processing, after which they are placed along the recess. Covered on top with a thick layer of dry foliage and a film in order to prevent freezing and moisture ingress. Work is carried out before the onset of frost.
How to protect bulbs from pests
After harvesting gladioli from the ground, it will not be superfluous to prevent diseases and pests, among the latter, the flower is most susceptible to the life of thrips.
To plant healthy plants next season, you should resort to one of the following methods of safety net:
- Add chopped heads of garlic to the container, placing them between the seed. As the vegetable dries, it is replaced with a fresh one. Naphthalene has a similar property.
- Cover with paraffin carapace, which should be removed before planting the flower. It will prevent spoilage of the seed during the entire winter storage. Applicable only to healthy specimens.
- Treat with a special insect-fighting spray. The tubers are preliminarily placed in a plastic bag, where the preparation is sprayed. After that, it is left to act for up to 1 hour.
- Subject to heat treatment. A similar method is used when detecting thrips. The bulbs are immersed in a liquid heated to 50 ° for 5 minutes, at the end of the procedure they are thoroughly dried.
- In case of mold damage - wash with laundry soap, then treat with any disinfectant, after removing the rotten parts. It is strictly forbidden to store in the same container.
When to plant
Correct preparation of gladioli for winter is a good contribution to the development of this lush, gorgeous flower for the next year; among the advantages, a small degree of time and effort can be noted.
The interval from digging to the moment of the first awakening is 35-40 days.
It is recommended to plant a flower in a new place before May 10, preliminary preparations for planting are carried out: the bulbs are peeled, soaked for 12 hours in potassium permanganate (0.5%), and a soda solution (1%) is also used for more intensive germination.

